Matrix Matters
This page will provide information on issues related to using the CoreLogic Matrix system that should matter to our Memberhsip. If you think of an issue that has come up while using Matrix, please email the board office at vaar@vaar.org so it can be highlighted on this page.
Hot Topics
We have had many questions on how to mark a property Active with Contingencies in Matrix. To do this, do the following:
- Log in to Matrix.
- Go click on the Input menu item, then select the subject property in the Listings area.
- Click on Residential Input Form
- On the first screen of your listing, locate the Listing Information heading.
- In the First Right Refusal Option, select the dropdown arrow and select Yes.
- Click on Submit Listing.
As an agent, when viewing properties in Matrix, you may want to look at the First Right Refusal Option. If it has a Yes in the field, there is a contingency contract.
First Right Refusal Option: YES
This issue relates to entering a subdivision name when entering a new listing and it showing up on the MLS Touch App. Please download the subdivision name document to use as a reference when entering subdivision names.
So what is the issue? When inputting a new listing, if a member does not use the Lookup Link on the Input Screen and select a Common Subdivision name, it may or may not appear on the subdivision section of the MLS Touch App.
So, how do you resolve the issue?
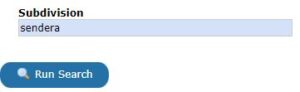
- While entering a new listing, or editing an existing listing, find the Subdivision field, then click on the Lookup Subdivision link.

- Using the Subdivision Name document you downloaded above, enter the Common Name for the subdivision, then click the Run Search button.
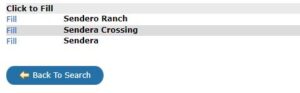
- Identify the correct subdivision name from the list of subdivisions, then click on Fill.
- Complete your listing input.
- By completing these steps, your subdivision name will appear when a user looks up a subdivision name while using the Client App.
NOTE: All of the Subdivisions in the Subdivision Name document have been configured in the Lookup Subdivision table.
There have been several fines assessed due to improper items in listings. There are two safeguard processes that can take place when inputting a new listing. The first process is Validate. When you click on Validate, the system checks to make sure that all mandatory fields are filled in property. However, during the Validate process, it does not check to see if you added a combo code in remarks, or that you have any type of branding in public remarks. That is where CheckIt comes in. CheckIt searches for common infractions such as lockbox codes in remarks or items that might violate policy and flags them in RED text.
To access CheckIt, do the following:
- Select the Input menu item, then select a listing.
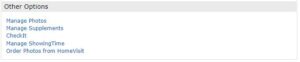
- Under the Other Options heading, click on CheckIt.
- When the screen appears, please note any items marked in RED as those are the items that could cause a fine.
- It is best practice to use CheckIt on all listings to make sure you stay in compliance with the rules.
The Board office has received many questions on how to send supplement documents such as a Seller's Disclosure to a client. In the past, a member would have to download the document, then attach the document to an email and send. With the new MLS Touch app, supplemental documents can be sent easily using the app.
To send a document using the MLS Touch App, do the following:
- Log in to the MLS Touch App
- Perform a search to find the subject property
- Scroll down to find the MLS Documents field and click to open
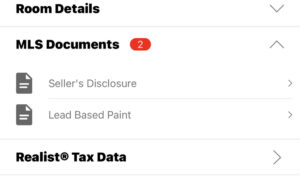
- Click on the document you want to send and it will open on your mobile device
- Click on the up arrow located at the top right side of your screen (iphone)
- Follow the prompts to either email or send by text.
Note: If members do not label the name of the documents when uploading them into Matrix, they will appear on the app as New Supplement. It is a best practice to name each of the documents when uploading them into Matrix.
Your Matrix profile picture is the picture that other agents see when they look you up using the Search --> Agent menu items. It is also the picture that is pulled from Matrix and is used as your profile picture for the MLS Touch App. Do not confuse this picture with the one that is set up in your portal profile that is found under My Information. They are different.
If you want to see what your current Matrix Profile picture looks like, go to the speed bar at the top of the Matrix screen and type ag <first name last name> replacing <first name last name> with your actual name.
If you want to change it, do the following:
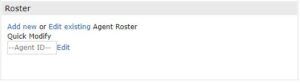
- Once logged in to Matrix, select the Input menu item.
- In the field below the Roster heading, enter your license number, then click on Edit.
- The Modify Agent screen will appear. Click on Manage Photos.
- Click on the Browse button, then locate your new photo on your computer. Please note that for maximum quality, upload photos at least 724 x 1086 pixels in size.

- Once you have uploaded your photo, you will need to slide the photo to the Primary Slot position. To do this, click on the grey Title bar and move to the Primary Slot.
- Click on Certify and Save to complete the process.
- Give the system about an hour or so to update your photo in your profile.
- Once your photo has been updated in Matrix, check to make sure it is also pulling it in the app as well. You may have to wait a little longer for the picture to update on the app.
Incorrect Address - Address must be accurate and complete.
Incorrect Fields for Street Name - Prefix and suffix portions of the address should be in assigned fields. As an example, N Harris St. should be in three different fields. N for North should be in the St Direction field, Harris should be in the Street Name field, and St. or Street should be in the Street Type field.
Incorrect/Incomplete Information - Listing content must comply with instructions in the information box for each field. Data must be accurate and complete.
Driving Directions - Directions must be descriptive in nature and contain turn by turn instructions. GPS is correct is not acceptable.
Property Location on Map Inaccurate - Property pin must be mapped to the correct location of the property. It is up to the member to verify the location once the listing has be submitted.
Title Company Info in Remarks - No Title Company info, name phone number, or email allowed in any remarks sections. There is a field in the listing input for Title Company.
Security Code in Remarks - Any access codes must ONLY be shared through supplements (PDF) or through the showing service. Not allowed in any remarks sections.
Training Materials
- Hover over the Search menu item and then select Quick.
- Enter your default search criteria in the appropriate fields. For example, if you are always searching in the Victoria, Calhoun, Jackson, Goliad, Dewitt, and Refugio Counties, select the counties in the County field. Click on the icon to the right of the County field to select your counties. Select each county and click on the Add button to add the county to the right side of the box. You can use the CTRL key to select multiple counties.If there are other fields you would like included in your default search criteria, enter the default values or make the appropriate selections.
- Once you have make your selections and/or entered your default values, click on the Gear at the top right side of yor screen, then select “Set currently selected search criteria as my starting default”.
- From now on, when you click on Search, then Quick, the criteria you set will be displayed on your sarch screen.
- You can clear your default search criteria at any time by clicking on the Clear link at the bottom left of your screen. Doing this will clear all fields and you will have to make your selections to perform a search. Please note, your default search criteria is still set for future searches.
- If you want to completely remove your Default Search criteria, click on the Gear at the top right side of your screen, then click “Reset to the system Search defaults”.
Once you are logged in to Matrix, you will notice the Hot Sheet widget on the home screen. This widget can be customized to your market area by doing the following:
- Click on the customize link at the bottom of the Hot Sheets widget.
- Let’s start with Residential properties. Make sure Residential is selected and then click on the Edit Criteria button.
- On the search screen, select your market area by making selections in the fields City, County, or Zip Code. As an example, if your market area is Victoria County, select Victoria from the County field. Click on the icon next to the county field to select your counties. You can also multi select items by holding down the CTRL Key and clicking on multiple counties. Click Add to add them to add your counties to the right side of the box.
- Once you have selected your criteria, click on the Save link at the bottom left of your screen to save your criteria.
- To set your Hot Sheet defined areas for the other property types, perform steps 1-4 again but this time select a different property type.
- Once your market area is defined for each of the property types, simply click on the desired property type to view the results.
Once you are logged in to Matrix, you will notice the Market Watch widget on the home screen. This widget can be customized to your market area by doing the following:
- Let’s start with Residential properties. Make sure Residential is displayed at the bottom left of the market watch screen. If not, click on the drop-down arrow and select Residential.
- Click on the Customize link at the bottom of the Market Watch widget.
- On the search screen, select your market area by making selections in the fields City, County, or Zip Code. As an example, if your market area is Victoria County, select Victoria from the County field. . Click on the icon next to the county field to select your counties. You can also multi select items by holding down the CTRL Key and clicking on multiple counties. Click Add to add them to add your counties to the right side of the box.
- Once you have selected your criteria, click on the Save link at the bottom left of your screen to save your criteria.
- When you go back to your home screen and click on your market watch for Residential properties, the data results will be reflective of the market area you defined in step 2 above.
- To set your market watch defined areas for the other property types, select the appropriate property type and perform steps 1-4 again. Once you have defined your market watch area for each of the property types, select the desired property type from the drop down menu and the Market Watch data will be displayed.
- Hover over the Search menu item and then select Quick.
- Enter your search criteria in the appropriate fields. For example, if you are wanting to create a Saved Search for all Active properties between $150,000 and $200,000 in Victoria County, enter 150-200 in the Price field and then select the Victoria in the County field.
- Click on Results to start the search.
- Once the results appear on your screen, Click on the Save link at the bottom left of the screen.
- Now, click on the New Saved Search link
- Enter a Search Name. For example, enter Victoria 150 K – 200 K, then check the box to Enable as Favorite Search on Home Tab.
You can now find your saved search under the My Favorite Searches Widget. You can save up to 10 Favorite Searches.
Additional Notes
To edit your saved searches, hover over the My Matrix tab, then select Saved Searches. Once there, you can change settings, criteria, etc.
Application:
Here are some example saved searches. If you are outside the Victoria are or do not serve this area, change Victoria to the county or counties you do serve.
100K – 150K Victoria
150K – 200K Victoria
200K – 250K Victoria
Remember, you are limited to 10 Favorite Search items.
- Conduct a search to identify the properties you want to email to your client.
- From the search the results, place a check mark next to each of the listings you wish to email to your client.
- Click on the Email link at the bottom left of the screen.
- Fill in your clients email address in the To: field
- If your client is a saved contact, you can click on the To: link to select a client from your list of contacts. Just double-click on the appropriate name in the list to add it to the To: below.
- Enter the subject of your message and any comments in the Email Body: field.
- Click the Send link at the bottom left of the screen.
There may be a time when you want to view only the selected properties without seeing all of the unselected properties in a single line display.
Narrow Search Results in a Single Line Display
- Conduct a search using your defined criteria.
- Select the appropriate listings for your client by placing a check mark next to the listing
- Click on the Refine link at the bottom left of the screen next to Actions.
- Click on the Narrow link
- All unselected properties will be removed from the single line display.
Discard Search Results in a Single Line Display
- Conduct a search using your defined criteria.
- Select the appropriate listings to discard by placing a check mark next to the listing
- Click on the Refine link at the bottom left of the screen.
- Click on the Discard link
- All selected properties will be removed from the single line display.
As a listing agent, you have access “Hit Counters” related to your listing(s). Only you have access to this information and this tutorial only applies if you have an active listing. There are two ways to access your “Hit Counters”.
- Locate the My Listings Widget on your home screen. If it is not currently displayed on your screen, look in the Additional widget and drag it to your desktop.
- Click on the My Hit Counters link.
- The statistics for your listing will be displayed on the screen. This is information you might want to share with your client.
The second way to display your “Hit Counters” is to select My Matrix, then My Listings. If Hit Counters is not showing on your screen, click on the down arrow next to the Show field and select Hit Counters.